Vuex 数据流心法
Vuex 数据流心法
1. 父子组件传递数据的传统方法
自从组件化模式成为前端主流后,开发中的一大问题就是如何在父子组件之间传递数据。
1.1 Props
Vue本身提供的props是最简单,也是最常用的父子组件通讯方式
父组件可以在html模板里直接把数据传递给子组件。
父组件:调用子组件时传递props
<template>
  <div>
    <h1>Props Down Parent</h1>
    <child title="My journey with Vue"></child>
  </div>
</template>
子组件:声明要接收的props
<script>
export default {
  props: {
    title: String
  }
}
</script>
props的使用非常广泛,几乎所有Vue项目都会使用,其最大的不足是只能父传子,不能子传父。
1.2 Event
事件机制是另一种可以传递数据的方法,主要就是使用Vue提供的$emit方法,配合v-on指令
父组件:
<template>
  <div>
    <h1 :style="{ fontSize: hFontSize + 'em'}">Event Up Parent</h1>
    v-on:事件名=要触发的函数或者表达式
    <child :fontSize="hFontSize" v-on:enlargeText="enlargeText"></child>
    $event是默认的事件参数
    <child :fontSize="hFontSize" v-on:enlargeText="hFontSize += $event"></child>
  </div>
</template>
<script>
export default {
  components: {
    child
  },
  data () {
    return {
      hFontSize: 1
    }
  },
  methods: {
    enlargeText (size) {
      this.hFontSize += size
    }
  }
}
</script>
子组件:
<template>
  <div>
    <h1 :style="{ fontSize: fontSize + 'em' }">Props Down Child</h1>
    <button @click="handler">文字增大</button>
  </div>
</template>
<script>
export default {
  props: {
    fontSize: Number
  },
  methods: {
    handler () {
      this.$emit('enlargeText', 0.1)
    }
  }
}
</script>子组件使用$emit来触发事件并传递参数,父组件通过v-on:eventName=handler来接收特定的事件并触发函数。
这样一来就实现了子组件向父组件传递传递数据。
要注意的是,$emit可以传递任意数量的参数,其函数原型是:
vm.$emit( eventName, […args\] )
另外在接收参数的时候,$event会作为第一个传上来的参数,可以直接用于表达式:
v-on:enlargeText="hFontSize += $event"
或者是函数参数:
v-on:enlargeText="enlargeText($event)"
但$event仅能默认接收第一个参数,所以如果$emit传递了多个参数,就不能使用$event来接收,直接使用函数名就可以了:
v-on:enlargeText="enlargeText"
在handler函数实现的时候再把要接收的参数个数以形参的方式定义清楚:
// 假设$emit传递上来了两个参数
enlargeText (arg1, arg2) {
  console.log(arg1, arg2)
}

// 当然使用解构语法也是可以的
enlargeText (...args) {
  console.log(args)
}
1.3 Event Bus
事件传递机制虽然简单易用,但是如果要跨层级进行组件通讯会十分繁琐,必须层层上传,而且如果是同级别组件也无法传递。于是第三种传递方式事件总线Event Bus应运而生。
事件总线Event Bus的思路是创造一个新的Vue实例作为事件中心,其他组件向这个新的Vue实例传递事件,并且通过它订阅自己需要关注的事件。
// 创建一个Vue实例作为Event Bus
import Vue from 'vue'
export default new Vue()

// 组件1 通过EventBus触发事件
import bus from './eventbus'

export default {
  methods: {
    sub () {
      if (this.value > 1) {
        this.value--
        bus.$emit('numchange', this.value)
      }
    },
    add () {
      this.value++
      bus.$emit('numchange', this.value)
    }
  }
}

// 组件2 通过EventBus得到事件
import bus from './eventbus'

export default {
  created () {
    bus.$on('numchange', (value) => {
      this.msg = `您选择了${value}件商品`
    })
  }
}
对一些比较简单的Vue项目而言,Event Bus就已经够用了。
1.4 Refs
Vue提供的$refs一般用于获取DOM元素,但其实也可以用来传递数据。
父组件:
<template>
  <div>
    <h1>ref Parent</h1>
    <child ref="c"></child>
  </div>
</template>

<script>
import child from './child'
export default {
  components: {
    child
  },
  mounted () {
    this.$refs.c.focus()
    this.$refs.c.value = 'hello input'
  }
}
</script>
子组件
<template>
  <div>
    <h1>ref Child</h1>
    <input ref="input" type="text" v-model="value">
  </div>
</template>

<script>
export default {
  data () {
    return {
      value: ''
    }
  },
  methods: {
    focus () {
      this.$refs.input.focus()
    }
  }
}
</script>可以看到父组件直接通过$refs拿到子组件的引用,然后直接访问了子组件的data数据。
但这种方法官方并不推荐,属于“奇巧淫技”,因为这样传递数据非常不利于日后的管理维护。
2. Vuex
2.1 Vuex基础
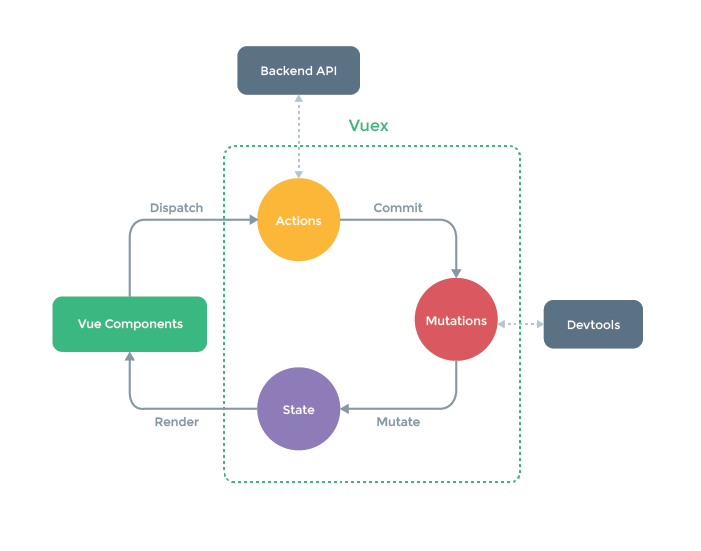
Vuex提供了一种新的统一集成式管理数据的解决方案,本质来说就是使用一个单独的js对象来在组件之间传递数据,类似Event Bus都是采用了一个中间者来统一管理和分发数据。
Vuex非常简洁好上手,配置方便,核心概念主要有
| 作用 | 调用方法 | |
|---|---|---|
| State | 存放数据,是一个单一状态树 | $store.state.x |
| Getter | 类似computed,用于从state派生变量 | $store.getters.x |
| Mutation | 类似event,是一个函数,调用后改变state内的数据,只能执行同步操作 | $store.commit('x', payload) or $store.commit({type:'x', payload}) |
| Action | 提交mutation,可以包含异步操作 | $store.dispatch('x', payload) or $store.dispatch({type:'x', payload}) |
| Module | 把数据分割成模块,每个模块都有各自的一套state,mutation,action等 | 推荐在导出每个模块时开启namespaced:true |
官网文档对于基本用法的介绍十分详细,这里就不再举例说明了。
比较值得一提的是module的使用和Vuex提供的一些工具方法。
一般实际开发中我们都会把store模块化,以便于管理和维护。
首先推荐在各个module里面开启namespaced,这个不是必须的,但是开启后所有的数据变化操作都可以指定是最哪个模块进行,否则由于Vuex会把所有的getter,mutation等方法都默认放在同一个全局空间里,多个同名的方法会被同时触发。
export default {
  namespaced: true,
  state,
  getters,
  mutations,
  actions
}
然后在store的index.js,也就是最外层的store声明文件导入模块并命名:
import products from './modules/products'
import cart from './modules/cart'

export default new Vuex.Store({
  modules: {
    products,
    cart
  }
})这样在使用的时候就可以直接指定模块名了,并且推荐和mapState,mapMutations等工具函数一起使用,避免每次都要写this.$store.state.cart.cartProducts这样一长串。
import { mapState, mapGetters, mapMutations } from 'vuex'
export default {
  name: 'PopCart',
  computed: {
    ...mapState('cart', ['cartProducts']),
    ...mapGetters('cart', ['totalCount', 'totalPrice'])
  },
  methods: {
    ...mapMutations('cart', ['deleteFromCart'])
  }
}
2.2 插件机制
Vuex通用支持自定义的插件
其作用就是在每次执行mutation改变数据的时候进行额外的自定义操作
// 声明一个plugin用于每次改变购物车数据的时候自动把新数据同步到localStorage中持久化保存
const myPlugin = store => {
  store.subscribe((mutation, state) => {
    if (mutation.type.startsWith('cart/')) {
      window.localStorage.setItem('cart-products', JSON.stringify(state.cart.cartProducts))
    }
  })
}

// 使用这个plugin
export default new Vuex.Store({
  plugins: [myPlugin]
})
2.2 自己实现一个Vuex
相比较于Vue三件套的Vue和VueRouter而言,Vuex的核心代码并不复杂:
let _Vue = null
class Store {
  constructor (options) {
    const {
      state = {},
      getters = {},
      mutations = {},
      actions = {}
    } = options
    this.state = _Vue.observable(state)
    this.getters = Object.create(null)
    // 处理传入的getter,使用defineProperty把传入的getter中的每一个函数绑定到this.getter上面
    // 并且把state作为默认参数传入
    Object.keys(getters).forEach(key => {
      Object.defineProperty(this.getters, key, {
        get: () => getters[key](state)
      })
    })
    this._mutations = mutations
    this._actions = actions
  }

  commit (type, payload) {
    this._mutations[type](this.state, payload)
  }

  dispatch (type, payload) {
    this._actions[type](this, payload)
  }
}

// 提供一个install方法注入自己到Vue实例中
function install (Vue) {
  _Vue = Vue
  _Vue.mixin({
    beforeCreate () {
      if (this.$options.store) {
        _Vue.prototype.$store = this.$options.store
      }
    }
  })
}

export default {
  Store,
  install
}本博客所有文章除特别声明外,均采用 CC BY-SA 4.0 协议 ,转载请注明出处!