VueRouter的原理和实现
Vue Router
先来看看VueRouter的使用方式
// router/index.js
// 注册VueRouter插件
Vue.use(VueRouter)

const router = new VueRouter({
  route: [
    {name: 'home', path: '/', component: homeComponent}
  ]
})

// main.js
// 创建Vue实例,注册router对象
new Vue({
  router,
  render: h => h(App)
}).$mount('#app')Vue注册插件的Vue.use()接受函数或者一个类,如果是函数就会被直接调用,是类的话就会调用类里面的install方法。
基本可以看出如果要实现一个VueRouter,大概要怎么写了。
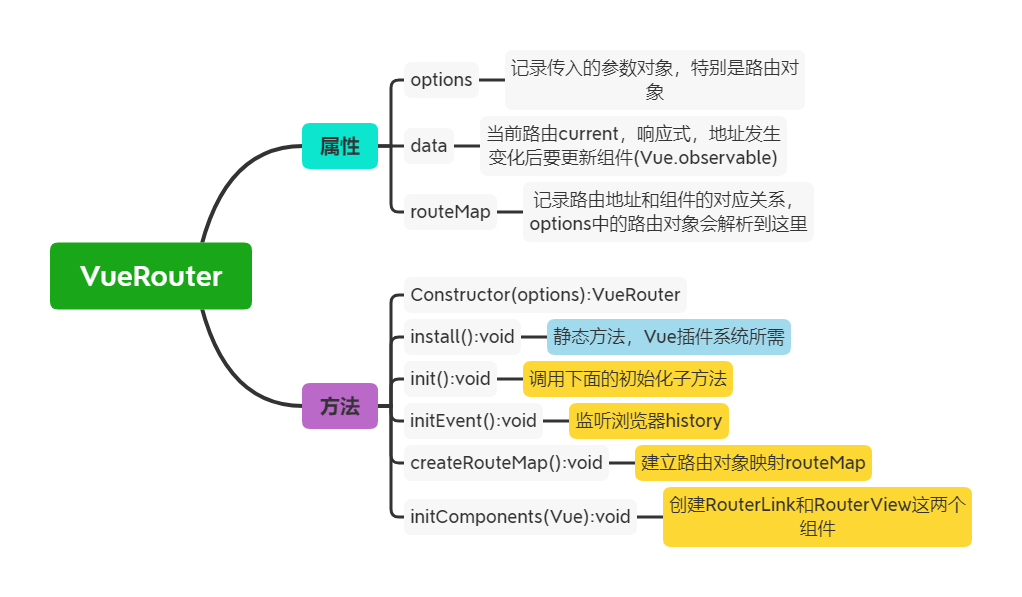
VueRouter的结构如下:
VueRouter提供了两个模式
history历史模式hash哈希模式
在初始化VueRouter时可以通过mode选项配置:
const router = new VueRouter({
  mode: 'history',
  routes: [...]
})hash模式就是通过地址栏中的#锚点来实现的,传统上用于在同一个页面中跳转到不同地方。hash的特点是改变时不会发送新的请求,所以通过监听hashchange这个事件就可以在前端为所欲为,包括实现各种组件渲染达到路由效果。
history模式是目前最流行的(hash看着实在不美观),通过浏览器的api来实现(api名字就是history)
1. Vue插件机制
VueRouter中的前面一部分代码都和现实Vue的插件机制有关,Vue作为主流的前端框架之一必然要提供插件接口来扩展功能,而所有的Vue插件要么本身是一个函数可以直接运行,要么是一个class并提供一个intall方法,这个方法会在使用Vue.use()注册插件时被调用。
static install (Vue) {
   //* 1. 判断当前插件是否已经被安装
   if (VueRouter.install.installed) {
     return
   }

   VueRouter.install.installed = true

   //* 2. 把Vue构造函数记录到全局变量
   _Vue = Vue

   //* 3. 把创建Vue实例时传入的router对象注入到Vue实例中
   //* 需要使用mixin混入
   // _Vue.prototype.$router = this.$options.router 直接这样实现是不行的
   // 因为this指向的是VueRouter(install是静态函数),并不是Vue的一个实例
   _Vue.mixin({
     beforeCreate () {
       // 混入后所有Vue实例包括组件都会有beforeCreate,导致会运行很多次
       // 所以我们需要判断,只对Vue实例执行,组件不需要执行
       if (this.$options.router) {
         // 组件选项中没有router,注意router是初始化Vue的时候作为参数传入的
         //(所有参数都会被放在$options对象里),就是一个VueRouter实例
         _Vue.prototype.$router = this.$options.router
         this.$options.router.init()
       }
     }
   })
 }
在intall方法里,首先要判断当前我们的插件是不是已经被运行过了,这一点很简单,使用一个闭包变量记录即可,可以把这个变量直接挂载到install这个静态方法上面。
然后需要使用Vue提供的mixin方法来把插件对象注入到Vue实例当中,这也是为什么我们可以直接在Vue组件里调用this.$router的原理,上面的代码也非常简明易懂。
在Vue初始化的时候我们会传入router对象(就是router.js,里面定义好了我们的路由规则)
new Vue({
  router, // 这个router会被放到this.$options里面
  render: h => h(App)
}).$mount('#app')然后我们通过在Vue的原型链上增加一个$router对象,把router赋值给它就行了。
_Vue.prototype.$router = this.$options.router另外值得一提的是,除了普通的在一开始import导入组件并赋值给route对象里面的component之外,我们还可以使用component:() => import('component.vue')的方式来动态按需加载。
const routes = [
  {
    path: '/',
    name: 'Index',
    component: Index
  },
  {
    path: '/blog',
    name: 'Blog',
    // route level code-splitting
    // this generates a separate chunk (about.[hash].js) for this route
    // which is lazy-loaded when the route is visited.
    component: () => import(/* webpackChunkName: "about" */ '../views/Blog.vue')
  },
  {
    path: '/photo',
    name: 'Photo',
    // route level code-splitting
    // this generates a separate chunk (about.[hash].js) for this route
    // which is lazy-loaded when the route is visited.
    component: () => import(/* webpackChunkName: "about" */ '../views/Photo.vue')
  }
]

const router = new VueRouter({
  routes
})
2. 初始化
2.1 构造函数
既然是一个class,当然就必须有构造函数了。
constructor (options) {
  this.options = options
  this.routeMap = {}
  this.data = _Vue.observable({
    current: '/'
  })
}我们通过监听点击事件来改变data.current,也就是当前的路径,这个变量是我们能够动态改变视图的关键,它必须是一个响应式的属性,因此要使用Vue提供的api来创建,也就是Vue.observable
当这个变量发生变化时,Vue就会重新渲染页面视图,因为另一个关键组件router-view依赖于它,这样我们就能得到新的页面了。
2.2 创建RouteMap
定义方法createRouteMap
接下来就是把传进来的router对象解析保存到RouteMap变量里
createRouteMap () {
  //* 建立路由键值对 <路由 - 组件> 储存到routeMap
  this.options.routes.forEach((route) => {
    this.routeMap[route.path] = route.component
  })
}
以后我们就可以直接通过浏览器地址路径找到对应的组件了
2.3 创建router-link和router-view组件
定义方法initComponents
这一步在下面的组件分析里会单独展开。
2.4 监听事件
定义方法initEvent
如果使用history模式的话,就需要监听popstate这个事件(浏览器地址栏前进后退),然后改变data.current
如果是hash模式,就需要监听hashchange这个事件,然后改变data.current
initEvent() {
  // 监听前进后退时浏览器触发的popstate事件
  window.addEventListener('popstate', () => {
    this.data.current = window.location.pathname
  })
}
2.5 总结
最后我们可以用init方法来统一调用上述的三个方法
init () {
  this.createRouteMap()
  this.initComponents(_Vue)
  this.initEvent()
}
3. router-view组件
通过router-view组件的实现我们可以更方便的理解页面视图是如何更新的。
我们在使用VueRouter时,一般都会使用router-view组件来表示这里要根据路由渲染页面:
<div id="nav">
  <router-link to="/">Index</router-link> |
  <router-link to="/blog">Blog</router-link> |
  <router-link to="/photo">Photo</router-link>
</div>
<router-view/>
而router-view就是VueRouter提供的一个内置组件,其实现也非常简单:
Vue.component('router-view', {
  render (h) {
    const component = self.routeMap[self.data.current]
    return h(component)
  }
})
首先通过上面我们构建好的RouteMap找到要渲染的组件,然后调用h函数渲染就行了。
h函数是虚拟DOM技术里出镜率极高的函数,来源于Snabbdom这个虚拟DOM模块,作用就是渲染虚拟节点Vnode(这里就是Vue的组件)到页面上。
4. router-link组件
Vue.component('router-link', {
  props: {
    to: String
  },
  render (h) {
    // 如果不使用完整版本的Vue预编译模板,就需要使用render函数而不是template
    return h(
      'a', // 标签名
      {
        attrs: {
          // html属性
          href: this.to
        },
        on: {
          click: this.clickHandler
        }
      },
      [ this.$slots.default ] // 生成的内容
    )
  },
  methods: {
    clickHandler(e) {
      // 使用pushState改变地址栏,但不会向服务器发送请求
      history.pushState({}, '', this.to)
      this.$router.data.current = this.to
      e.preventDefault()
    }
  }
  // template: '<a :href="to"><slot></slot></a>'
})
router-link本质上就是创建一个a标签,把要跳转的地址设置到href属性上,并不复杂。
关键在于劫持点击事件,当点击发生时改变data.current的指向即可。
本博客所有文章除特别声明外,均采用 CC BY-SA 4.0 协议 ,转载请注明出处!